
![]() Posted by Felix Weyne, May 2019.
Posted by Felix Weyne, May 2019. ![]() Author contact: Twitter | LinkedIn
Author contact: Twitter | LinkedIn ![]() Tags: Hancitor, Chanitor, packer, unpacking, spaghetti code, shellcode, control flow obfuscation, import table reconstruction, reflective PE loading, YARA
Tags: Hancitor, Chanitor, packer, unpacking, spaghetti code, shellcode, control flow obfuscation, import table reconstruction, reflective PE loading, YARA
It has been a while since I have written a blog - I have been working on some tools and other projects instead - so I decided to have another go at it ![]() . A while ago, the Twitter users 0verfl0w_ and Vitali published some nice blogs on the Hancitor malware.
This made me curious to also have a look at the malware family.
. A while ago, the Twitter users 0verfl0w_ and Vitali published some nice blogs on the Hancitor malware.
This made me curious to also have a look at the malware family.
The Hancitor malware family has been around for a while and its core job is to download and execute additional malware. In order to succeed at its job, the malware must succeed in being run undetected on the machine and thus effectively stay under the radar of security software such as an antivirus.
One of Hancitor's endeavors to bypass antivirus is by making use of a booby trapped Office document and to instruct Office to inject the Hancitor binary in a legitimate Windows process. This method has been documented well by the Airbus security team and has been used untill approximately the summer of 2018.
Around that time, the Hancitor crew has shifted its infection mechanism by making their spammed Office documents download a packed executable to disk. An executable written to disk usually gets inspected/scanned by antivirus, yet the Hancitor malware has been reasonably successful in evading being detected (initially) as malicious.
Hancitor's evasive success can be partly attributed to the packer/crypter being used. In this blog I will do a (technical) deep dive into Hancitor's packer, which has not changed much since the summer of 2018. I will discuss how the packer protects its payload and how it tries to thwart analysis. At the end of this blog, I'll demonstrate how this packer has also been used by many other malware families in the past.
The packer
The below image gives an overview of the sample which I'll discuss in this blog. Although I will be discussing a specific packed Hancitor sample, the information in this blog is applicable to many other packed Hancitor samples, as the packer has not changed much between the many SPAM campaigns (particularly the first layer of the packer has been very consistent). In this archive (password=infected) a collection of many packed Hancitor samples can be found (many thanks to Brad and James for sharing the samples on Twitter!).
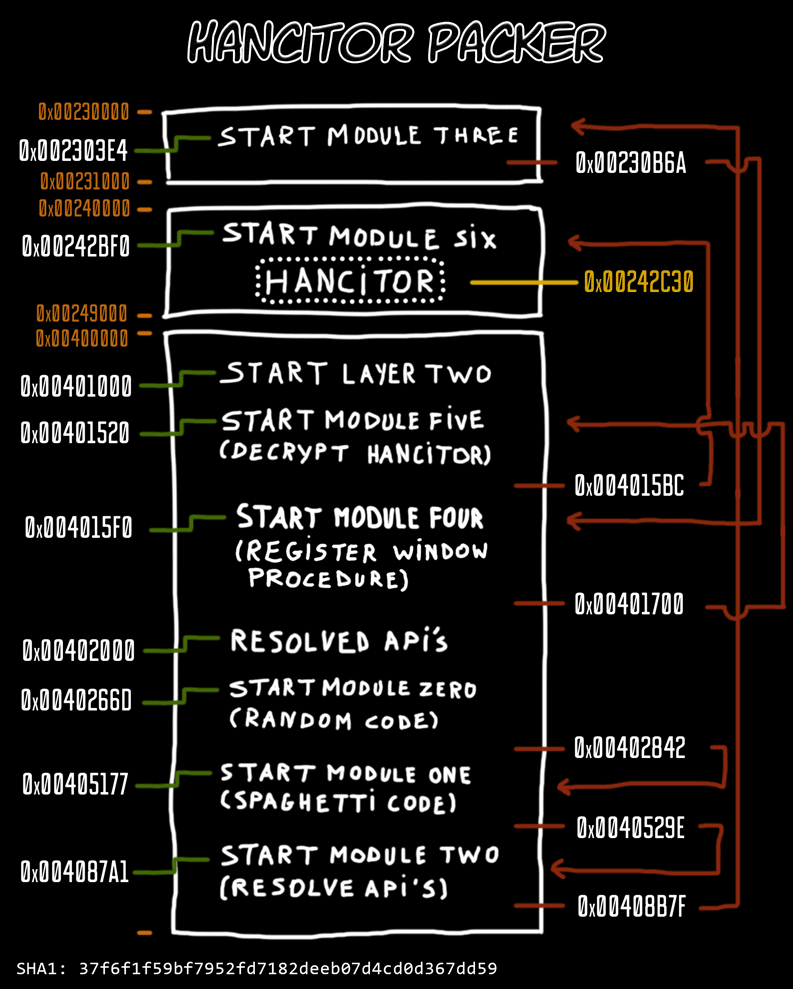
Image one: Overview of the packed Hancitor sample
In order to keep the analysis organized, I have a divided the packed sample into "modules" (pieces) based on functionality. For each module I have added the address of the first and last relevant assembly instruction, such that interested readers can use this blog as a reference when unpacking the sample themselves in a debugger. For those who are interested in the disassembled code, but don't want to plow through the entire sample in a debugger, I have added a commented assembly output per module. Lastly, for the malware hunters among us, I have added a YARA rule for the packer in the blog's addendum.
- Module 0: link to commented disassembled code (start address: 0x0040266D)
- Module 1: link to commented disassembled code (start address: 0X00405177)
- Module 2: link to commented disassembled code (start address: 0X004087A1)
- Module 3: link to commented disassembled code (start address: start_mem_region+0x3E4)
- Module 4: link to commented disassembled code (start address: 0X004015F0)
- Module 5: link to commented disassembled code (start address: 0X00401520)
- Module 6: link to commented disassembled code (start address: start_mem_region+0x2BF0)
Spaghetti code
The packed Hancitor executables always start by executing random, non-dodgy functions. We will define this code region as module zero (disassembled code). Putting random code near the executables' entrypoint makes them look unique, that is to say, for security products which (understandably) only parse/emulate executables partially because of performance reasons. The random code ends by jumping to the next module, module one (disassembled code).
The disassembled output of the module one section is hard to interpret. The packer's author has broken the linear sequence of assembly instructions by reordering the instructions and connecting them to each other via JUMP instructions, as can be seen in image two. Additionally, between each instruction random instructions - which will never be executed - are placed.
Image two: Spaghetti code which decrypts the next module
This technique, known as spaghetti code, bypasses static detection techniques which rely on the malicious instructions being placed consecutively on each other. The goal of the spaghetti code is to change the memory protection of a part of the executable (to which we will referrer as module two) and then to decrypt said part via a simple XOR loop. Once the relevant part is decrypted, the code execution is transferred to that part via a simple JMP EAX instruction.
Resolving APIs
Module two (disassembled code) has three tasks: resolve the addresses of APIs which will be used in the next module, map itself and the next module in a newly allocated memory region and hunt for the start of the next module in the new memory region (delimited by the 70C5BA88 byte marker).
I will not discuss how the API addresses are resolved, as the packer will use a similar technique in a later module, at which point I'll discuss the technique in depth (see paragraph: reconstruct import table). The most important part of the API resolving code is the list of APIs which are resolved:
- kernel32_GetProcAddress
- kernel32_GetModuleHandleA
- kernel32_LoadLibraryA
- kernel32_VirtualAlloc
- kernel32_VirtualFree
- kernel32_OutputDebugStringA
- ntdll_memset
- ntdll_memcpy
The APIs in the list will be used to map DLLs into the packer's process memory, to resolve additional API addresses and to allocate and free memory regions. The thing in module two that stands out the most is the way (API) strings are embedded inline with the assembly code, as can be seen on image three.
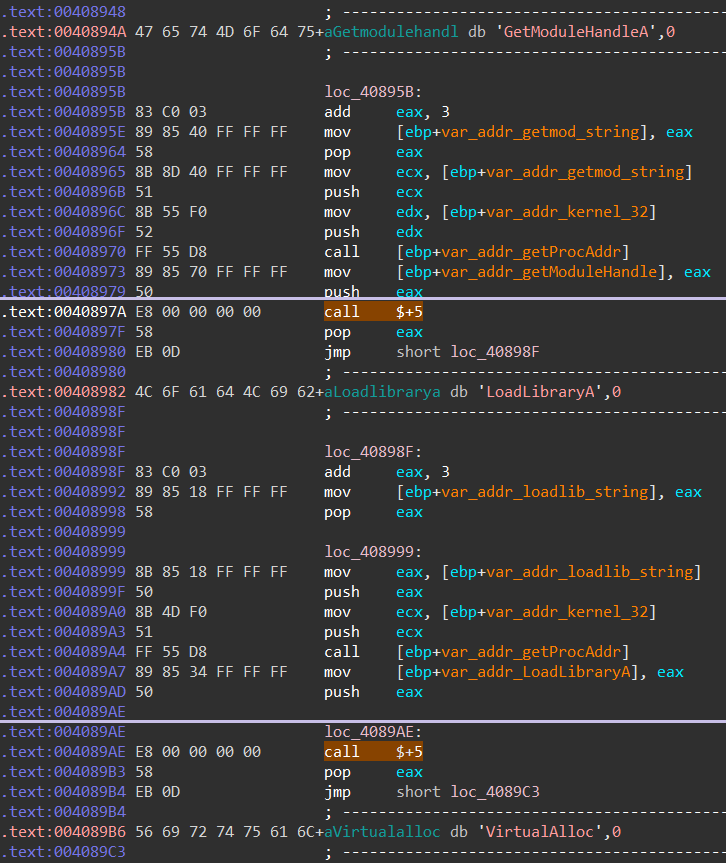
Image three: Data (API names) inline with the assembly code
Most compilers will place strings in a region which is different from the region where the assembly code resides. To get the memory address of the inline string, the assembly code makes use of a simple trick: it will execute a CALL $+5 instruction (a procedure call where the destination is the subsequent instruction).
Executing a CALL instruction will result in the return address (i.e. the address of the instruction that follows the call instruction) being pushed on the stack. The return address is immediately retrieved by executing a POP EAX instruction (pop the top of the stack into the EAX register). The return address is thus pointing to the location of the POP instruction. Because the assembly is interested in the start address of the inline placed string, three bytes needs to be added to return address (skip the POP and JMP short instructions). We can see the assembly code performing this action as follows: ADD EAX, 3. It is useful to remember this little trick in your short-term memory, because it will also be used in the next module.
Decrypt next layer
Module three (disassembled code) starts by overwriting code at three locations, as can be seen on image four. These locations correspond with the packed executable's entrypoint (module zero), the start of the spaghetti code (module one) and the start of module two (the addresses are described on image one).
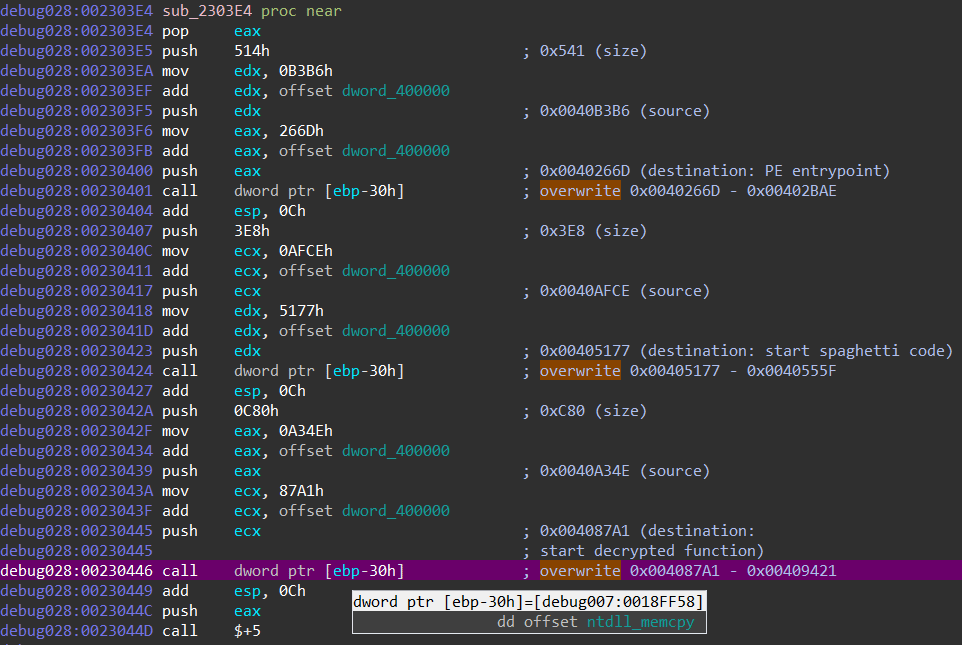
Image four: Overwriting three previous modules
The code then continues by decrypting the next layer (the next modules), by making use of the APIs listed in the previous paragraph. Once the next layer has been decrypted, the module resolves the addresses of the APIs which will be used in the next layer (image five), to which we will refer as layer two.
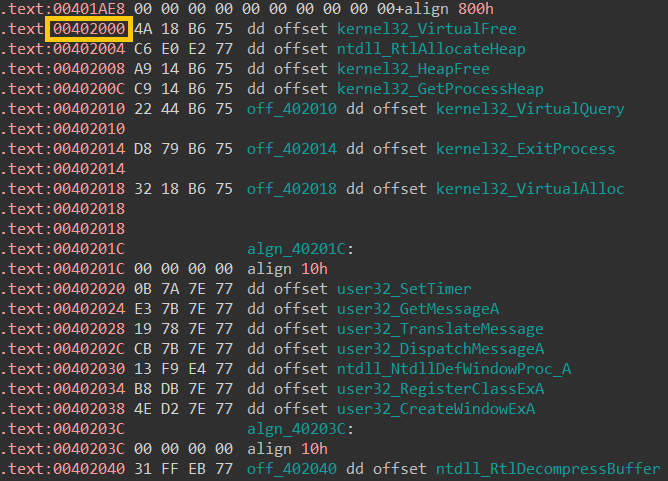
Image five: addresses of resolved APIs in memory
After having resolved the API addresses, the code does something somewhat odd: it patches values in the PE header and it overwrites the section header. This action doesn't make much sense to me, because I believe these values are of no use once the executable has been mapped into memory ![]() ? Nevertheless, this action helps us in our efforts to dump the second layer executable from memory, as it seems like we have the correct PE header as well as the decrypted code.
? Nevertheless, this action helps us in our efforts to dump the second layer executable from memory, as it seems like we have the correct PE header as well as the decrypted code.
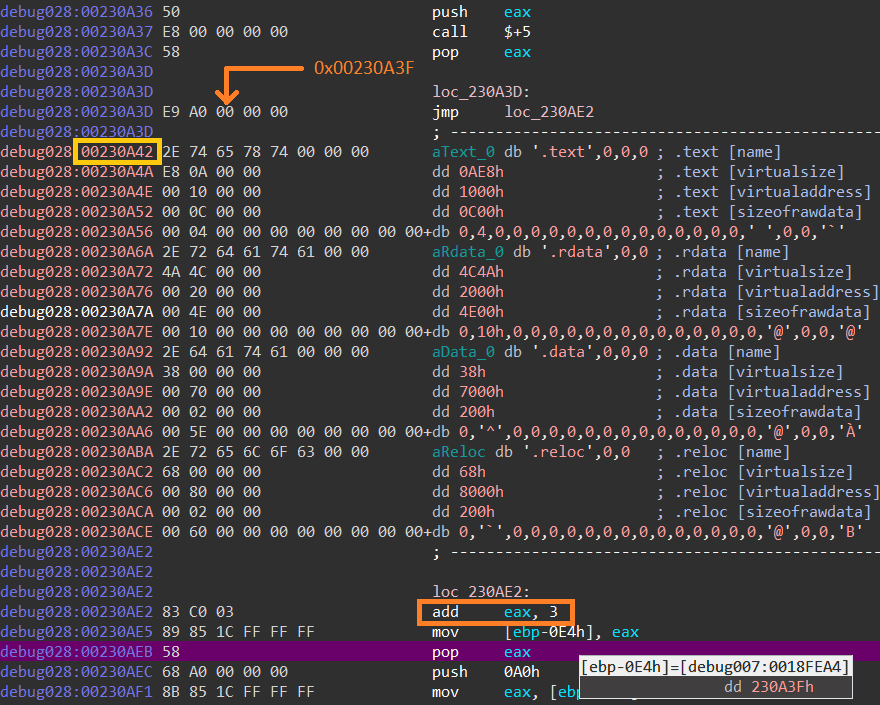
Image six: overwriting section headers bug
Upon inspecting the dumped second layer executable, I noticed that the section headers were shifted.
When we look at the code responsible for overwriting the section headers, we can notice an interesting bug in the packer. Remember the inline data trick I discussed in the previous paragraph? It looks like the packer's author made a small mistake while using it to overwrite the section header ![]() .
.
Because the JMP instruction following the POP EAX instruction in module three consists of five bytes (it consisted of only three bytes in module two), the start address of the section header data is off by three bytes (image six). Instead of adding three bytes to the EAX register, the code should've added six bytes. If we correct this mistake while debugging, we get a correct dump of layer two (which I have added here).
Module three ends by destroying its own code. The destruction is performed via a simple loop which overwrites every address in the module with zero valued bytes (image seven).
Image seven: self destruction code in action (as seen via IDA debugger)
Given the fact that the module is mapped in a newly allocated memory region (image one), one can only guess why the packer's author didn't just free the region. Maybe (s)he wanted to avoid analysis techniques which dump code by hooking VirtualFree calls? Maybe (s)he wanted to keep the modules nicely separated (VirtualFree can not be called before execution is transferred to another region/module, as a VirtualFree call would destroy the code responsible for said execution transferring)? After destroying everything, a jump is made to the entrypoint of the second layer executable, to which I will refer as module four.
Decrypt Hancitor binary
Module four (disassembled code) contains a debug-thwarting trick which can be confusing if you are not aware of what is happening. The module makes use of a technique called control flow obfuscation. The goal of the trick is to make use of a Windows API call in such a way that the main code flow does not continue on the code following the API call. Instead the main code flow is transferred to a callback function which is executed during the API call. If you are not aware of this trick, you would probably jump over each instruction in module four which would result in loosing control over the execution, since no debugger points are set in the registered callback function. Image eight shows how the Hancitor packer makes use of this technique.
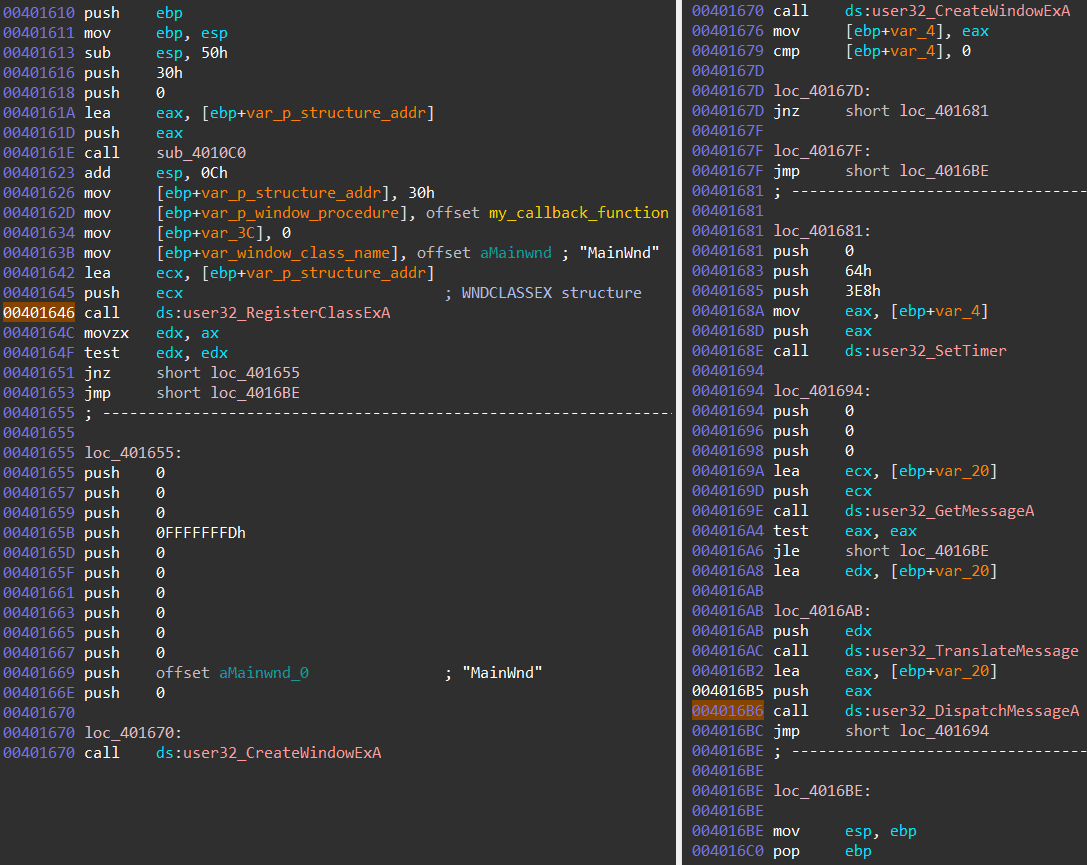
Image eight: Control flow obfuscation by making use of Window Procedures (RegisterClassExA & CreateWindowExA)
The callback function is registered as part of a Windows Class Ex structure, which is passed as an argument to the RegisterClassExA API call. When a call is made to the DispatchMessageA API, the callback function gets executed. The callback function contains a jump to the fifth module.
Module five (disassembled code) does not contain many interesting functions. The most important function is a function which decrypts and decompresses the Hancitor executable
(if you are still reading at this point, you probably wondered when we would ever get to this stage ![]() ). The encrypted executable is stored as data inside layer two, the decryption is performed by three simple XOR loops, as can be seen on the decompiled function code on image nine.
). The encrypted executable is stored as data inside layer two, the decryption is performed by three simple XOR loops, as can be seen on the decompiled function code on image nine.
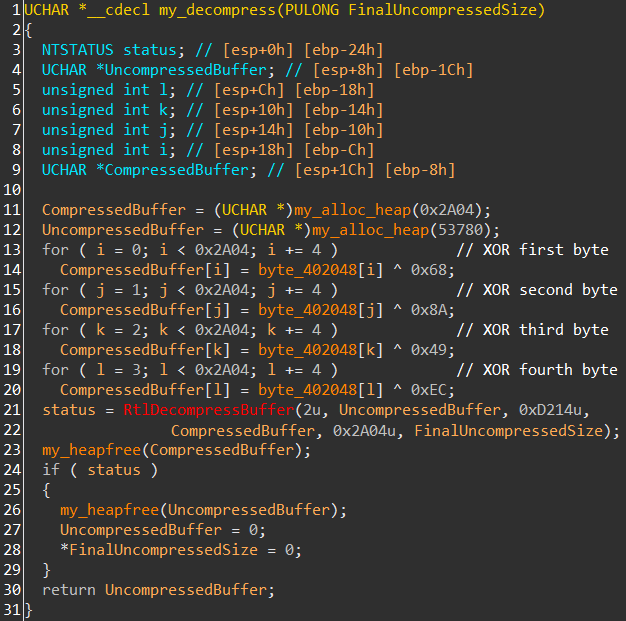
Image nine: decompiled decryption code
The decompression is performed via a function call to RtlDecompressBuffer (note that the address of this API was resolved in module three, the puzzle pieces are starting to come together!). The decrypted executable is mapped into a newly allocated memory region, to which we will refer to as module six.
Reconstruct import table
Module six (disassembled code) contains the last functionality of the packer. The goal of the module is to emulate behavior which normally is performed by the Windows Loader: map libraries (DLLs) into the process' address space, resolve the addresses of APIs and store those addresses in the executable's Import Address Table (IAT). This behavior needs to be emulated by the packer because it has loaded the Hancitor executable directly into memory. If the Hancitor executable were to have been loaded from disk, the Windows Loader would have done its job. Obviously, loading the malware from disk is not feasible, as it would be detected quickly by security products. Code similar to the code in this module is frequently present in malware and greyhat tools which load an executable reflectively. As the reader will notice, the reverse engineered code discussed below for example looks very similar to a leaked Gozi/IFSB code part (mirror) which is described by the author as: 'a routine used to create, initialize and execute [a] PE-image without a file'.
I am not a suitable person to write referral material about PE structures ![]() . However, for the sake of giving some background information on the actions which are performed in module six, I'll try to briefly write down some pointers about the PE's import tables.
. However, for the sake of giving some background information on the actions which are performed in module six, I'll try to briefly write down some pointers about the PE's import tables.
The IAT is a table of pointers to function (API) addresses which is used as a lookup table when an application is calling a function. The addresses of functions inside a library (DLL) are not static but change when updated versions of the DLL are released, so applications cannot be built using hardcoded function addresses. In order for the Windows Loader to know which libraries and functions it needs to import, they obviously need to be defined inside the executable.
This is where the Import Directory Table (IDT) comes into play.
The IDT contains structures which contain information about a DLL which a PE file imports functions from. Two important fields in those structures are FirstThunk: a relative virtual address (RVA) inside the IAT, and OriginalFirstThunk: a RVA of the Import Lookup Table (ILT). The Import Lookup Table contains an array of RVAs, each RVA points to a hint/name table
(source: PE format, Microsoft). As the name suggests, the hint/name table contains the name of a function which needs to be imported.
Module six starts by calculating the in-memory start address of the Import Directory Table. It calculates said address by parsing the PE header of the in-memory mapped Hancitor executable, as can be seen on image ten. First, the executable searches for the start offset of the PE header, a value which is stored at the e_lfanew field (ref: PE offsets). The module then jumps to a certain offset from the start of the PE header to locate a field whose value contains the RVA of the Import Directory. Because this value is a relative offset, the value needs to be added to the in-memory start of the mapped executable. This resulting calculation contains the in-memory start of the Import Directory Table.
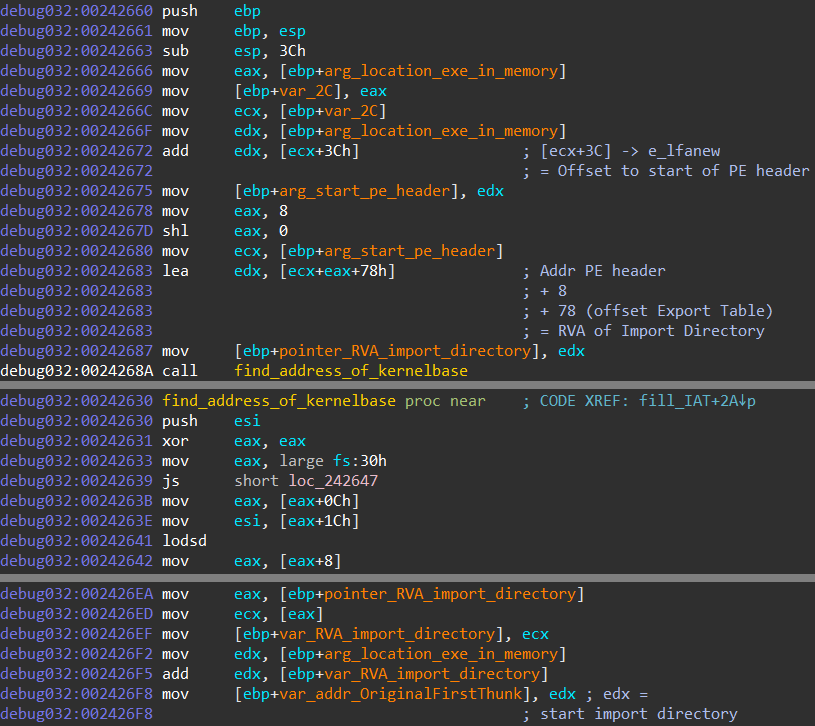
Image ten: Resolve address of kernelbase & find address of import directory table
For module six to be able to map libraries (used by Hancitor) into the process' address space, it needs the memory location of kernel32's LoadLibrary and GetProcAddress functions. To retrieve the function addresses, the packer needs to figure out at which address (inside its own process address space) the kernel32 library is mapped. For this hunt the packer relies on a small piece of shellcode which reads the Process Environment Block (PEB). The below slide from a fifteen-years-old presentation about shellcode explains how the PEB is used to resolve kernel32's base address.
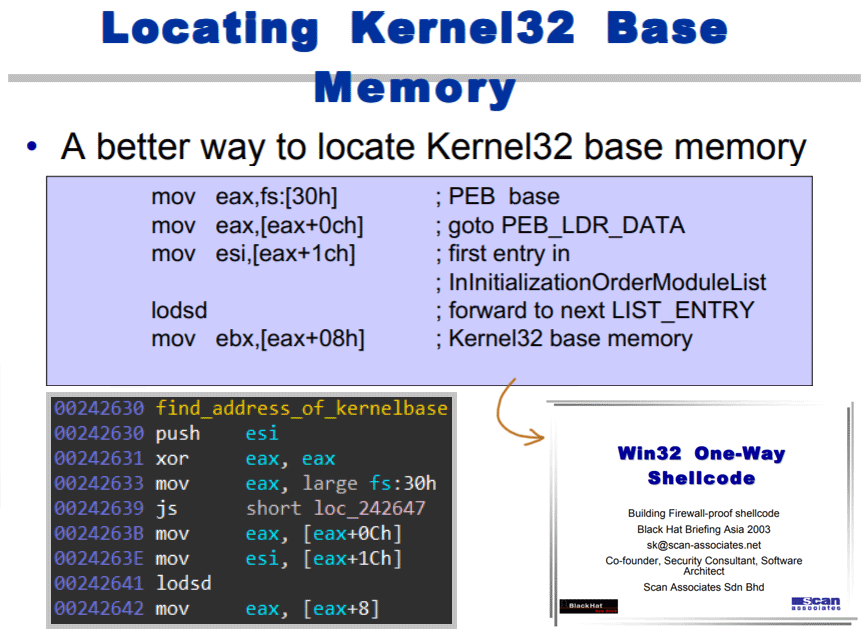
Image eleven: Fifteen-year-old presentation discussing shellcode which retrieves the kernel32 base memory address
After having resolved the in-memory location of the LoadLibrary and GetProcAddress functions, module six reads the FirstThunk and the OriginalFirstThunk field values inside the Import Directory Table (image twelve, image thirteen).
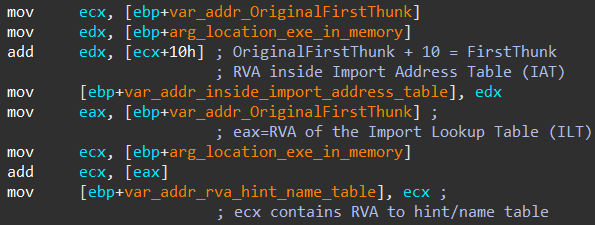
Image twelve: Parsing Import Directory Table for OriginalFirstThunk & FirstThunk fields
By enumerating these fields, the module knows via the corresponding hint/name tables which functions need to be imported. The libraries are imported via calls to the LoadLibrary function, the function addresses are resolved via calls to the GetProcAddress function.
The module writes the function addressess into Hancitor's Import Address Table. The result of this action can be seen on image fourteen (note that the Import Directory field values can be nicely visualised via Hasherezade's PE bear). A graphical overview of the relation between the fields and import tables discussed in this paragraph can be seen on image thirteen.
This action is the last action by the packer, the execution can now *finally* be transferred to Hancitor's code ![]() .
.
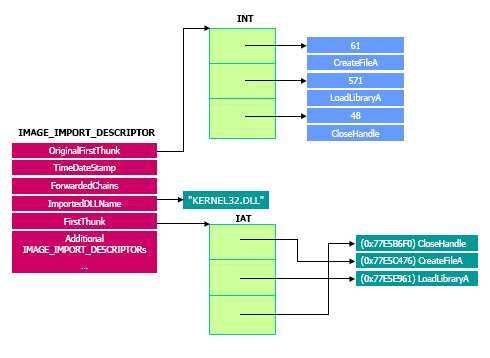
Image thirteen: Graphical overview of the relations between the import tables.
Source: dematte.org.
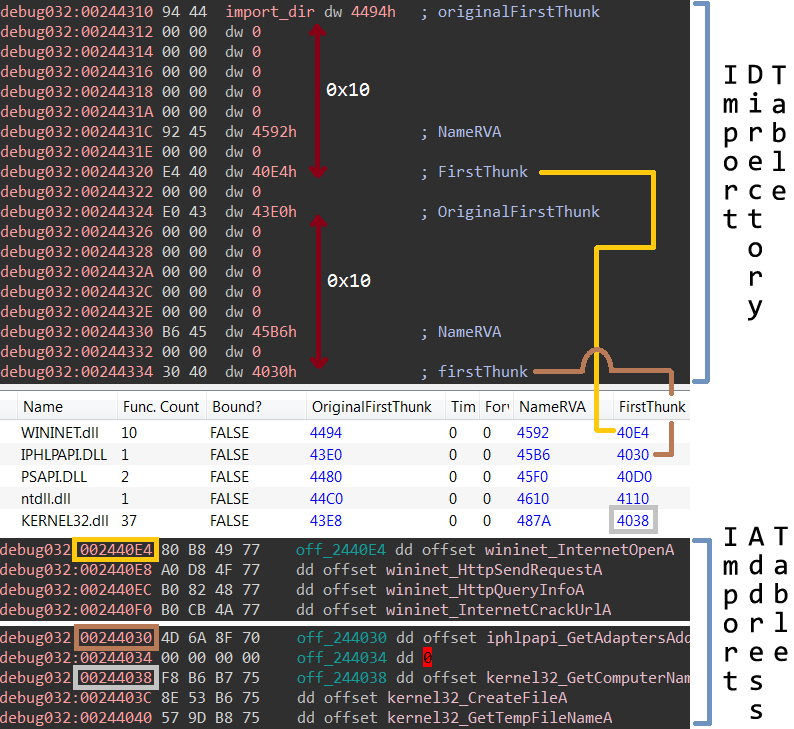
Image fourteen: Parsing the Import Directory Table (IDT) with the ultimate goal of filling the Import Address Table (IAT)
Old packer, still does the job
During the hunt for additional packed Hancitor samples (using the below YARA rule), I noticed that some of the packed samples were protecting a malware family which didn't look like Hancitor at all ![]() . One sample protected some kind of Delphi malware which embedded the names of Turkish banks. The malware looked very similar to the ATMZombie malware, which
Kaspersky blogged about (mirror). When we look at an ATMZombie sample which is explicitly mentioned in the Kaspersky blog, we can see that the packer of the mentioned sample is the same packer as the one which is discussed in this blog.
Another packed sample which I noticed during my hunt protected a shellcode loader. The sample is mentioned in a Proofpoint blog (mirror) as a Metasploit Stager which in turn downloaded Cobalt Strike.
. One sample protected some kind of Delphi malware which embedded the names of Turkish banks. The malware looked very similar to the ATMZombie malware, which
Kaspersky blogged about (mirror). When we look at an ATMZombie sample which is explicitly mentioned in the Kaspersky blog, we can see that the packer of the mentioned sample is the same packer as the one which is discussed in this blog.
Another packed sample which I noticed during my hunt protected a shellcode loader. The sample is mentioned in a Proofpoint blog (mirror) as a Metasploit Stager which in turn downloaded Cobalt Strike.
At this point it became clear to me that this packer has been around for a time, and that it isn't exclusively used by Hancitor. In fact, when I kept digging, I found many samples of (old) malware families which were packed by this packer. Some examples are: Zeus/Panda banker, Cryptowall, Ramnit, PoSeidon and Gootkit. All packed and unpacked malware samples can be found here (password=infected). When I launched a YARA search on parts of the encrypted module two bytes (there are 255 variations, as a single byte XOR key is used in the spaghetti code of module one), I found older versions of the packer. One example is a packed Qadars sample. The sample is mentioned as an IOC in an ESET article (mirror) from 2013. This suggests that the packer has been around for at least five years already.
Addendum: YARA Rule
import "pe"
rule hancitor_packer
{
  meta:
    author = "Felix Weyne, 2019"
    description = "Hancitor packer spaghetti code (loose match)"
    hash1= "37f6f1f59bf7952fd7182deeb07d4cd0d367dd59"
    hash2= "2508b3211b066022c2ab41725fbc400e8f3dec1e"
    hash3= "3855f6d9049936ddb29561d2ab4b2bf26df7a7ff"
    hash4= "e9ec4a4fb6f5d143b304df866bba4277cd473843"
  strings:
    //E9=JMP, EB=JMP SHORT, 71/0F=JNO
    $change_sp={89 EC (E9|EB|71|0F)}		//mov    esp,ebp
    $2={5D (E9|EB|71|0F)}			//pop    ebp
    $3={BF ?? ?? ?? 00 (E9|EB|71|0F)}		//mov    edi, 274C67h
    $4={81 ?? ?? ?? ?? 00 (E9|EB|71|0F)}	//add    edi, 17E792h
    $5={57 (E9|EB|71|0F)}			//push   edi
    $6={BE ?? ?? 00 00 (E9|EB|71|0F)}		//mov    esi, 88Bh
    $7={6A 00 (E9|EB|71|0F)}			//push   0
    $8={54 (E9|EB|71|0F)}			//push   esp
    $9={6A 40 (E9|EB|71|0F)}			//push   40h
    $mov_eax={B8 ?? ?? ?? 00 (E9|EB|71|0F)}	//mov    eax, 5ADBh
    $add_eax={05 ?? ?? ?? 00 (E9|EB|71|0F)}	//add    eax, 0E525h
    $12={8B 00 (E9|EB|71|0F)}			//mov    eax, [eax]
    $13={FF D0 (E9|EB|71|0F)}			//call   eax
    $ecx_zero={B9 00 00 00 00 (E9|EB|71|0F)}	//mov    ecx, 0
    $xor={30 07 (E9|EB|71|0F)}			//xor    [edi], al
    $18={41 (E9|EB|71|0F)}			//inc    ecx
    $19={47 (E9|EB|71|0F)}			//inc    edi
    $20={39 F1 (E9|EB|71|0F)}			//cmp    ecx, esi
    $21={58 (E9|EB|71|0F)}			//pop    eax
  condition:
    filesize < 110KB
    and pe.is_32bit()
    and #add_eax >= 3
    and #mov_eax >= 3
    and all of them
    and for any i in (1..#xor):($change_sp in (@xor[i]-400..@xor[i]+400))
    and for any i in (1..#xor):($ecx_zero in (@xor[i]-300..@xor[i]+300))
}